A quick guide about how to transfer your Jekyll blog from GitHub to Bitbucket and host it with Aerobatic for free!
Recently I decided to transfer my personal blog which is implemented with Jekyll from GitHub to Bitbucket and access it with the Aerobatic addon.
Here is a compact list of steps you have to follow if you also want to host your Jekyll blog on Bitbucket:
-
Import the GitHub repository with your blog to Bitbucket.
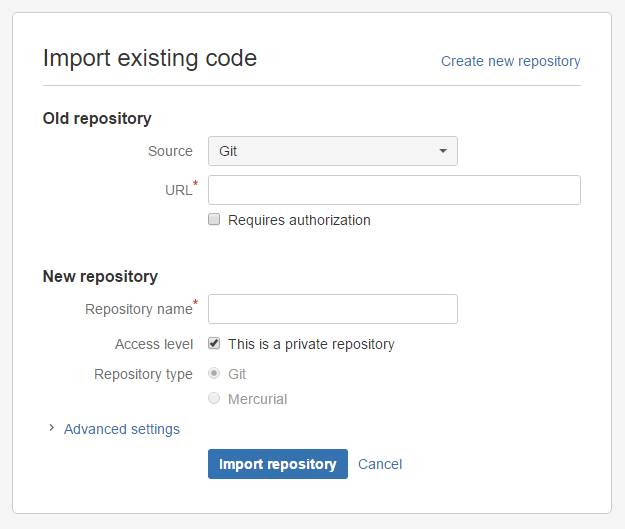
In the main menu of Bitbucket, under the Repositories tab, you see the option Import repository. Click on it. You now see the following window:

Go to your GitHub repository and copy the URL (https://github.com/YOUR_USERNAME/YOUR_BLOG_NAME.git) of the repository into the URL field of the dialog in Bitbucket, name your new repository and specify if it going to be public or not. Moreover, you can set some advanced settings before saving.
-
Add the Aerobatic addon in your Bitbucket account.
Go to the Aerobatic website and choose free plan which supports up to two sites and one domain. For me this plan is totally sufficient. If you have more sites then go for a bigger plan.
Click on the Try this plan button and on the next page grant access to the addon in your Bitbucket account.
-
Activate the automatic build (continuous integration) of your blog, that will run each time you commit new changes to Bitbucket.
Based on the information found in the documentation of Aerobatic, you have to add the following snippet in the packages.json file of your blog. If you do not already have a packages.json then create one on the root level of your blog’s folder. You will not have to commit any compiled files (_site folder) on Bitbucket, since everything is generated on the fly during the build process.
{ "_aerobatic": { "build": { "engine": "jekyll" } } } -
Remove the pygments plugin from the _config.xml file.
One of the advantages of Aerobatic is that it provides support for a big list of Ruby gems that you can use in your blog. The syntax highlighter gem with the name pygments belongs to this list. If you have referenced it in the _config.yml file then you have to remove it, eitherway your blog is not going to compile.
Remove the following (marked with bold):
-
gems: […, …, …, pygments]
-
highlighter: pygments
Apart from that, if you want to have syntax highlighting support out of the box, you have to add the following line in the _config.yml file
PygmentsCodeFences: true -
-
If you want to use your own domain instead of the standard aerobatic.io, then you have to follow the guide from the aerobatic documentation. I have to mention that in my case successfully register my custom domain only when I added a dot at the end of the cloudfront.net target that aerobatic provided me with:
[your_dns_value].cloudfront.net.Apart from the previous change, I also did the following changes in the Hosting settings tab of the Aerobatic menu:
-
Subdomain: www
-
Require SSL yes
-
That’s it! With only fours (five if you want to register a custom domain) simple steps you have a fully functional Jekyll blog running on Bitbucket.