Create an Azure Function with Storage Table in Visual Studio Code
Back in 2017, I wrote an article about how to program an Azure Function in Visual Studio. With the current article I want to give the current state of creating Functions, this time in Visual Studio Code.
We are going to create a GET Function that retrieves all the rows from an Azure Storage Table and returns them the caller.
Here are the steps from scratch:
-
Open Visual Studio Code and create a new Folder
-
Install the npm package azure-functions-core-tools:
npm install -g azure-functions-core-tools -
Install the Azure Functions extension from the Extensions-tab in Visual Studio Code
-
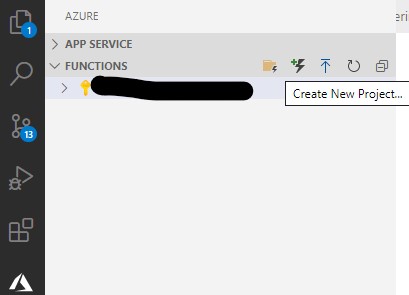
Click on the Azure-tab in Visual Studio Code and create a new local Azure Functions project:

-
You will be asked to configure the new created Function.
- Select the HTTP Trigger type of Function
- Select the Anonymous Authentication, since this will be a test Function accessible from public. In case of real & in-production Functions, you will want to select the Function Authentication option
-
Visual Studio Code generates the boilerplate code of the Function for you, you can press F5 and test the Function in your browser, you get the URL of the Function in the Terminal of your Visual Studio Code. Here is the code that created automatically:
using System;
using System.IO;
using System.Threading.Tasks;
using Microsoft.AspNetCore.Mvc;
using Microsoft.Azure.WebJobs;
using Microsoft.Azure.WebJobs.Extensions.Http;
using Microsoft.AspNetCore.Http;
using Microsoft.Extensions.Logging;
using Newtonsoft.Json;

namespace MyNamespace
{
    public static class MyFunctions
    {
        [FunctionName("MyFunction")]
        public static async Task<IActionResult> Run(
            [HttpTrigger(AuthorizationLevel.Anonymous, "get", "post", Route = null)] HttpRequest req,
            ILogger log)
        {
            log.LogInformation("C# HTTP trigger function processed a request.");

            string name = req.Query["name"];

            string requestBody = await new StreamReader(req.Body).ReadToEndAsync();
            dynamic data = JsonConvert.DeserializeObject(requestBody);
            name = name ?? data?.name;

            string responseMessage = string.IsNullOrEmpty(name)
                ? "This HTTP triggered function executed successfully. Pass a name in the query string or in the request body for a personalized response."
                : $"Hello, {name}. This HTTP triggered function executed successfully.";

            return new OkObjectResult(responseMessage);
        }
    }
}
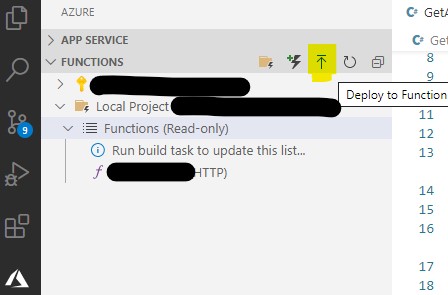
- Now we deploy the created Function to Azure.
- Select the name of your Function App
- Select the location you want to deploy your App. The deployment will start.

- After that, you want to update your Function and add the Storage Table call. First you have to install the following Nuget extension Package:
dotnet add package Microsoft.Azure.WebJobs.Extensions.Storage --version 3.0.4 - We will now copy part of the code from my older article about Functions and do the following changes:
- Remove the post option from the request parameter of the Function
- Added the Table and StorageAccount attributes in the new outTable parameter. The AzureWebJobsStorage option is the default StorageAccount name, and we can leave it like that.
- Do not forget to set both Row & Partition Key, when inserting new rows in your Table Storage
- Use the CloudTable object for querying the Storage Table. The TableQuery object we created, returns all entries of the Table.
My GET-Function now looks like this:
using System.Threading.Tasks;
using Microsoft.Azure.WebJobs.Extensions.Http;
using Microsoft.AspNetCore.Http;
using Microsoft.Extensions.Logging;
using Microsoft.WindowsAzure.Storage.Table;
using Microsoft.Azure.WebJobs;

namespace MyNamespace
{
    public static class Functions
    {
        [FunctionName("MyFunction")]
        public static async Task<DummyEntity[]> Run(
            [HttpTrigger(AuthorizationLevel.Anonymous, "get", Route = null)] HttpRequest req,
            [Table("dymmytable"), StorageAccount("AzureWebJobsStorage")] CloudTable dummytable,
            ILogger log)
        {
            log.LogInformation("C# HTTP trigger function processed a request.");

            TableQuery<DummyEntity> query = new TableQuery<DummyEntity>();

            var querySegment = await dymmytable.ExecuteQuerySegmentedAsync(query, null);

            return querySegment.Results.ToArray();
        }
    }
}

public class DummyEntity : TableEntity
{
    public string Firstname { get; set; }

    public string Lastname { get; set; }
}
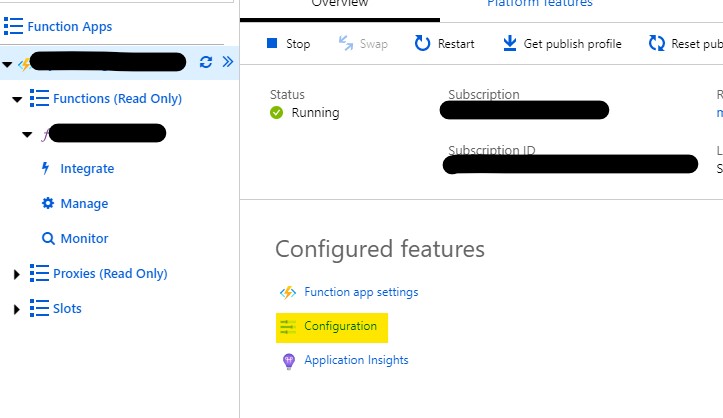
- Before you click F5 to test your Function you have to do one more configuration which is to update the connection string of the default AzureWebJobsStorage. Go to the Azure Portal, then to your Function App, click on Configuration, copy the connection string and add it in the local.settings.json file of your local project. This configuration will be used when you test your Functions locally.

Thats it. Now every time you update the Function code locally you will have to deploy it manually the way we saw before.
TODO: I still in research mode for creating an automated mode for every check-in of the code in Git ;)
Here are the resources that I used while I was researching:
https://docs.microsoft.com/en-us/azure/azure-functions/functions-develop-vs-code?tabs=csharp