Hints and tips about Load and Web Tests with Microsoft Visual Studio
When dealing with large web applications you will definitely have to apply some load to the infrastructure before going or even during being online. A Load test is a predefined set of URL requests that are submitted to your application from multiple virtual users. The number of the users or the amount of time a Load tests runs, can be defined from you.
By testing your application with Load tests you can be sure about the maximum workload or number of requests that your infrastructure can support and handle simultaneously. Having this information you can decide if you have to buy (on premise case) or rent (cloud case) new hardware.
With this article I would like to give some tips and tricks for features of the Load tests in Microsoft Visual Studio.
IP Switching
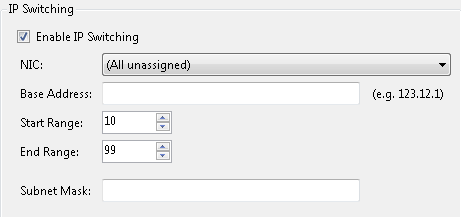
As already mentioned, we are using Load tests to simulate multiple users who use your application. It is often important that each of these users is using a different IP. The reason for this can be a security policy or the authentication strategy of your application. In order to activate this feature click on the LOAD TEST option then on Manage Test Controllers and then on Properties. There you can set the base IP and a range of different IPs. You can also define the type of the internet connection you want to simulate.
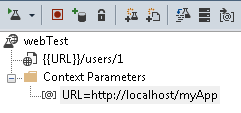
Context Parameters
A Load test in Microsoft Visual Studio is a set of web tests. A web test is a collection of URL requests that you send to your application. In order to avoid of writing the same base URL for each step again and again, you can define a context parameter which is a simple key-value variable and use this variable in your URLs. Every time you change the value of the parameter all URLs receive the change and thus you can save time:
Check the business logic of the responses you get
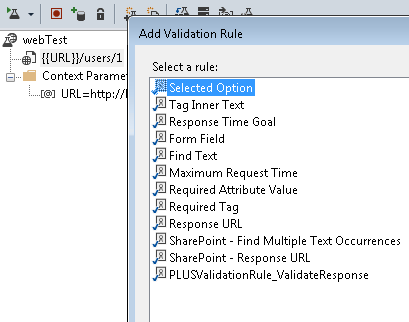
When testing with Load tests your focus is mainly on finding out the limits of your application and your hardware infrastructure. However, you often want to check if the replies you receive from your application are correct and valid. I suggest you to use the following two validation checks:
-
Define some validation rules for each step of your web tests. My two favorites are the Find Text and the Response Time Goal rules. With the Find Text rule I can check if the response contains a specific string and with the Response Time Goal I can define the allowed time that a request has to run.
-
Another important validation check is the Expected Response URL that you can define on each step of your web tests. By defining the expected URL you can be sure, before going to the next step of the test, that the returned or redirected URL from the server is the correct one.
Apply some conditional logic to a set of test steps
You can use the validation logic not only to stop the execution of a web test, but also to decide based on the result of the current step if the next step or a number of the next steps are going to be executed. This feature is a simple conditional if clause that you can insert between two steps. You can use a conditional if for deciding if the user could be successfully logged in the application. If not, then you have to do other URL requests or even retry the login request.
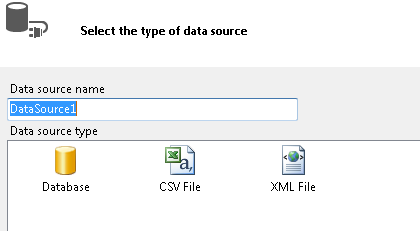
Specifying your test data
When using Load tests you often have to use different test data for each simulated user. This data can be stored in .csv files or come directly from a database. The data is then parsed from your web tests during run time. In order to bind the data to your web tests, you have to add a new Data Source. If you choose to work with .csv files then you have to pay attention to the following setting:
This setting will affect the correctness and speed of your web test. If you want to access the data from a coded plugin (WebTestRequestPlugin) then you have to set the property to “Select all columns”. Otherwise, you are going to see the following error: Request failed: There is no context parameter with the name ‘DataSourceName.CsvName#csv.Column’ in the WebTestContext.
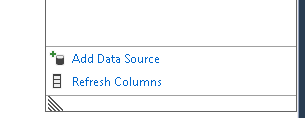
If you change the name of a column in your .csv file, do not forget to refresh the column names in your web tests so that you can choose the new column:
Use test data in your URLs
You might be in a situation where you want your URLs to contain information from your test data. In that case you cannot use a context parameter as we showed before, since this parameter is defined only once in your web test and cannot be changed in runtime. For changing the URLs during the runtime you have to use a plugin which access the data source, for example a .csv file, and replaces a specific placeholder in the URL with the value from the data source and in each iteration you get a different value from the data source.
In the following case we defined a USER placeholder which is going to be replaced during the run time from a plugin with a real value of a user.

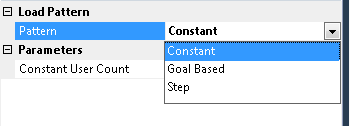
Define the load pattern of your tests
There are times when you want to apply the maximum users load from the beginning of a test and there are times when you want to use a more realistic approach and start with a specific number of users and every once in a while add more. You can experiment with different approaches by changing the Constant Load Pattern property of your Load tests. The constant load pattern in the simplest one, while the goal based is much more sophisticated and tries to simulate as much as possible a realistic scenario.
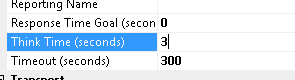
A user may stop and think before an action, your web test also
Not all users are making the one request after the other since there is a thinking time between two requests. In the predefined steps of your web tests you can set a think time and simulate this delay. This will make your Load tests feel even more realistic.
Conclusion
Like we cannot imagine a software without unit tests which test small parts of the application, we also have to think about the big picture and test our application under high pressure, even when we are only at the beginning of the implementation. This was only a small subset of information about Load tests in Microsoft Visual Studio. If you want to learn more about this technology do not hesitate to contact me.